Junk Mail Handling
As you can imagine, as a school we send a considerable number of email communications home in the course of our work. Sometimes the email software used by parents may wrongly classify mail from us as “junk mail”, and file this away from your other mail. This can result in you missing important emails from the school.
Given that the school has no control over how parents and carers computers handle the mail we send, there is nothing we can do to resolve this at our end, but we hope that the following will be helpful in allowing you to adjust your email client’s settings so that you always get the relevant communications in good time.
Step 1: Check your junk mail folders from time to time.
Microsoft Outlook Desktop Client – By expanding the list of mail folders you should be an ‘Inbox’ folder where your mail will go by default. By scrolling down you should also find a ‘Junk Mail’ folder. Check this for any emails that have been misfiled. Right click any email that are not junk and select the ‘Junk’ group then the ‘not junk’ option.
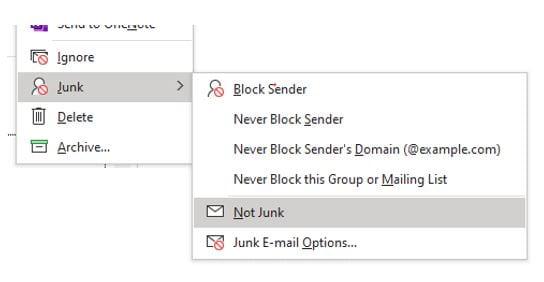
Microsoft Outlook Office 365 online app – Once you have found the Junk mail folder (also by default on the left of your screen), and selected an email that is not junk, click the “not Junk” Option.
Gmail – Open the “Spam” folder. Search for the emails using the domains shown in step 2, eg @groupcallalert.com then select all the emails shown. Click “More” and then “not Spam”.

Step 2: Update the ‘Safe Senders’ list.
It if often possible to set up your software so that mail from certain domains is never marked as junk. Mail from the school will generally come from an email addresses with one of the following domains.
@aberdeenshire.gov.uk
@glow.sch.uk
@groupcallalert.com
Microsoft Outlook Desktop Client – From the same Junk Mail group, select the Junk E-mail options., then safe senders, and Add the three domains shown above.

Microsoft Outlook Office 365 online app – Go to Settings (may be shown as a cog symbol “Settings  “) In the Settings search box search for “safe senders and domains”. Use the “+Add” option to add the domains shown above.
Gmail – Click the Cog, then “settings”. Click “Filter” then “Create new filter”. For each of the domains listed, search for mail from a given domain then choose “create a filter with this search” and choose the option under “When a message arrives that matches this search”, “Never send it to spam”.
For other email software a web search for how to “whitelist a domain” will provide the relevant instructions.